Curved Poly
Intro
General Features
Shape Editing
First Steps into Shape Editor
User Interface and Settings
Operators and Views
Pointings Operator
Vertices
Handles
Edges
Polygons
Selection Operator
Tessellation Operator
Elasticity and Edge Normal
Curved Poly Inspector
Primitives and Demos
Assets and Libraries
Advanced Shape Editing
Hide Operator
Shape Control Operator
UV Operator
Backgrounds Operator
Creation and Composition
Anatomy of a Curved Poly Model
Create Operator
Geometries Operator
Unwraps Operator
Edit Operator - Overview
Edit Operator - Making Custom Primitives
Edit Operator - Inspecting and Fixing
Handles
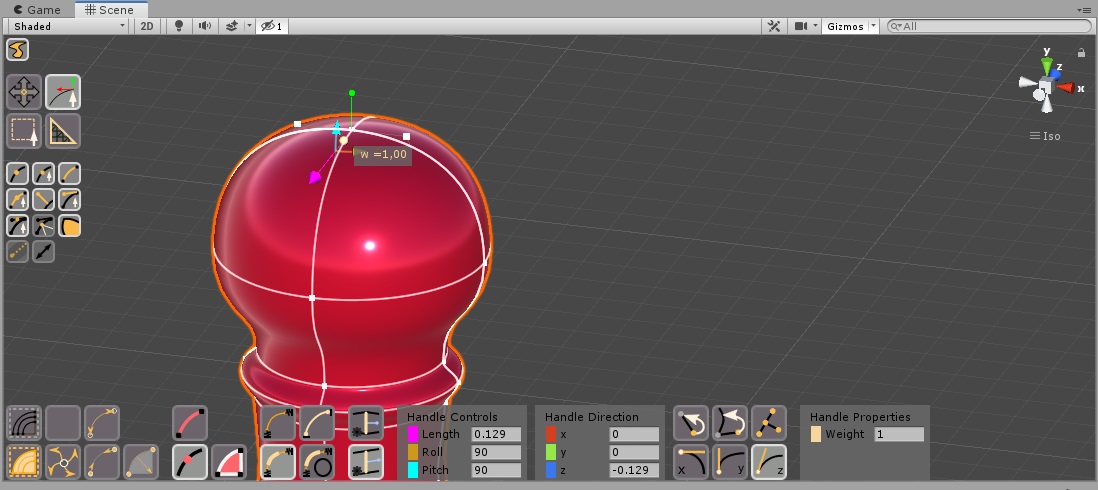
Fig. 1 The operator when a handle is active.
To activate an handle, you need first to activate a vertex or an
edge. For this reason, you need to make sure that  Handles is enabled, and also you need to
have enabled either
Handles is enabled, and also you need to
have enabled either  Vertices or
  Edges.
You should also consider enabling
Edges.
You should also consider enabling  Weights if you wish to control the handle weight.
An handle can be activated by clicking one of the little white cubes which are shown when a vertex or an edge are already active. Activating a handle will show:
- The Length Control, a linear arrow which allows you to change the distance of the handle from its related vertex.
- The Roll Control, an arc-shaped arrow which allows you to rotate the handle around the direction of the Editing Normal. Such rotation will not affect the normal or the other handles attached to the vertex. The arrow is available regardless the normal is visible or not.
- The Pitch Control, an arc-shaped arrow which rotate the handle on the plane it share with the Editing Normal. Such rotation will affect the normal and the other handles attached to the vertex, they will all rotate of the same amount.
- The Weight
Control
, drag the little sphere to change the weight value assigned to the handle and change the shape
of the edge.
Note: sometimes, two handles on the same vertex may be aligned. While two handles are aligned, any change made on one of the two will also affect the other. Such alignments can't be removed with Curved Poly - Shape Editor.
While a handle is active, you will also have more GUI controls on your Dynamic Menus Area:


 Edge Elasticities Controls: control the way in which edges answers
to a handle movements; there are four different elastic behavior, and they are explained in one of the next sections.
Edge Elasticities Controls: control the way in which edges answers
to a handle movements; there are four different elastic behavior, and they are explained in one of the next sections. 

 Edge Auto-Normal Controls: control the way in which edges normals
are updated after a handle is moved; there are two different auto normal behavior, and they are explained in one of the next sections.
Edge Auto-Normal Controls: control the way in which edges normals
are updated after a handle is moved; there are two different auto normal behavior, and they are explained in one of the next sections. - Handle Controls: write or correct handle Length, Roll or Pitch. Roll and Pitch values are evaluated with formulas based on the orientation of the Editing Normal, and may change if the Normal changes.
- Handle Direction: write or correct the x,y or z coordinates of the handle. Note: the software will keep always a 90° angle with the editing normal during this changes in order to keep the whole surface smooth. For this reason, while editing the x component (for instance) you may see the other two components change, or you may even not be able to change one of the three coordinates.
 Back to Vertex
, this Button to activate the vertex this handle refer to. It is useful in situations in which
you have much stuff in the scene, or too many controls on the object, and you find hard to access the vertex.
Back to Vertex
, this Button to activate the vertex this handle refer to. It is useful in situations in which
you have much stuff in the scene, or too many controls on the object, and you find hard to access the vertex. Back to Edge
, Press this Button to activate the edge this handle belongs to. It is useful in situations
in which you have much stuff in the scene, or too many controls on the object.
Back to Edge
, Press this Button to activate the edge this handle belongs to. It is useful in situations
in which you have much stuff in the scene, or too many controls on the object. Center Handle
, Correct the Roll Value of the Handle, so that it becomes centered with respect of the two
other handles it has on its left and right. If the two handles are aligned, the centered handle will have an exact 90° angle with both them.
Center Handle
, Correct the Roll Value of the Handle, so that it becomes centered with respect of the two
other handles it has on its left and right. If the two handles are aligned, the centered handle will have an exact 90° angle with both them.

 X-Y-Z Handle Directions
, correct the direction of the handle by aligning it to the x, y, z directions. Left-Right
(X Button), Up-Down (Y Button), Backward-Forward (Z Button) directions are respectively chosen depending on the current direction. Such correction will affect only the Roll Value. Note: the software will keep always a 90° angle with the Editing Normal during this changes in order to keep the whole surface smooth. If the x,y or z directions are not on 90° with the normal, the handle direction will be correct to the closest direction available satisfying such constraint.
X-Y-Z Handle Directions
, correct the direction of the handle by aligning it to the x, y, z directions. Left-Right
(X Button), Up-Down (Y Button), Backward-Forward (Z Button) directions are respectively chosen depending on the current direction. Such correction will affect only the Roll Value. Note: the software will keep always a 90° angle with the Editing Normal during this changes in order to keep the whole surface smooth. If the x,y or z directions are not on 90° with the normal, the handle direction will be correct to the closest direction available satisfying such constraint.- Handle Properties: write or correct the handle properties. Actually the only available property here is the Weight. Note: the weight is constrained inside a specific interval. For user experience reasons, I use a different interval in the scene control and in this value field. While using the little sphere, the weight can be adjusted in the interval [0.2,5.0]. While using the value field, it is can be adjusted in the interval [0.001,9.99]. I decided this while tuning the User Experience on the little sphere.
<< Prev Next >>